
Recipe: Baking Adventures - Macaronnage
February 04, 2012If you follow me on Twitter, you'll know that I've been on a baking binge lately! No, not THAT kind of baking.. but rather, dessert baking.
If you've never had a macaron before, it's basically a meringue based cookie sandwich, that can be any which flavour you desire. The shells usually come in a variety of colours, while the fillings are many different flavours. Macarons themselves are characterized by having "feet" at the bottom of the cookie, and they're notoriously difficult to make.
"Macaronnage" is the process of making the perfect macaron. I've heard that making them takes lots of practise, so I challenged myself to make them, to see how well they would turn out on my first try.
I put together this recipe after hours of reading recipes and watching macaron making videos! Unfortunately, things didn't turn out exactly how I wanted them to, so I will be pointing out mistakes along they way. That way you won't make them! Enjoy!
Tools
Mixer
Kitchen Scale
Piping bag
Large rounded piping tip
Baking sheet w/ parchment paper or Silpat sheet

INGREDIENTS
Cookies:
90g Eggwhites aged at room temperature for 24 hours (approx. 3 eggs)
20g granulated sugar
200g powdered sugar
110g almond flour (finely ground almonds)
Food colouring (optional)
Vanilla Buttercream:
1/2 cup unsalted butter
1 - 2 cups confectioner's sugar
3 teaspoons vanilla extract
1 - 2 tablespoons milk
pinch of salt
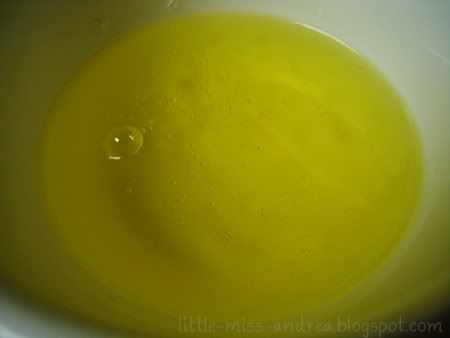
Aged eggwhites after 6 hours
Now, I'm really paranoid about food safety. I thought to myself.. 24 hours of eggwhites at room temperature has to be wrong! Wouldn't the whites go bad? Well, if you look up there, that's the whites after 6 hours at room temperature. It starts to form bubbles.. so I was scared and put the bowl back into the fridge! The aging of the eggwhites is very important for the formation of the characteristic foot, so go ahead and leave them out for 24 hours. After a full day, you can put the whites into the fridge.

To start off, take the aged egg whites, and whip them until they start to form a foam (seen above). Gradually add in the sugar while mixing, until you reach the look and consistency of a glossy meringue (seen below).
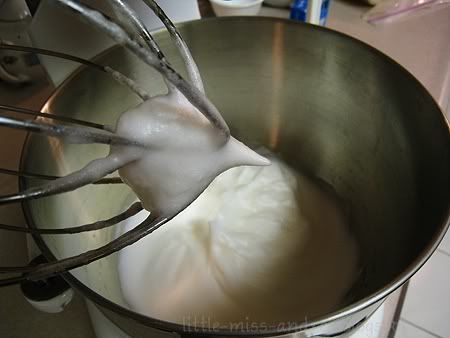
While whipping the egg whites, I was worried about over beating. Beating the egg whites too much will result in a dry cookie, so I stopped when the mixture looked like the image above. I'm pretty sure that I actually didn't beat the eggs enough, as the peak isn't very stiff, and it looks more foamy than glossy. But I went ahead anyway. When making these macarons, make sure you have stiff peaks forming in the mixture, but not so stiff that its a gooey mess.
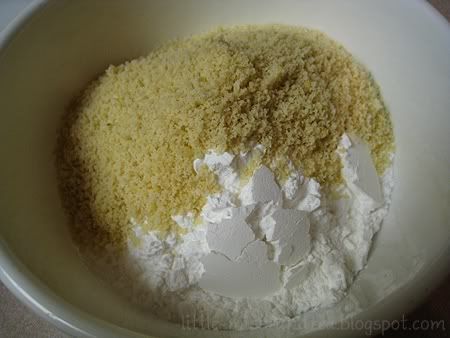
Take the almond flour and combine it with the confectioner's sugar in a separate bowl (if your almond flour is not finely ground, give it a good pulsing in a food processor). Fold the dry mixture into the meringue, being careful not to overmix - it shouldn't take more than 50 strokes to mix it all together. I chose to add some colour to my cookies, so around the 35-40th stroke, I poured my mixture into two different bowls, added my desired colours, and continued to mix until fully incorporated.
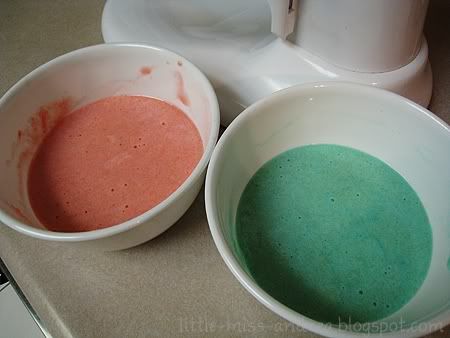
I made both pink & blue cookies in this batch. Fill a piping bag fitted with a round tip with the batter, and pipe onto sheets in rounds with a 1 to 1.5" diameter (depends on how large you want your cookies). Now here's where the good part comes in. Right when I was reading to pipe the batter.. I honestly could NOT find my piping bag and tips. It was GONE. So I made due and used Ziploc bags and cut the corners. I do not recommend the use of Ziploc bags at all when making macarons. The batter becomes relatively runny when warmed by the hands, and the ziploc bag is too small and too flimsy to work with. I had to use so much effort just to stop the cookies from being piped too big..
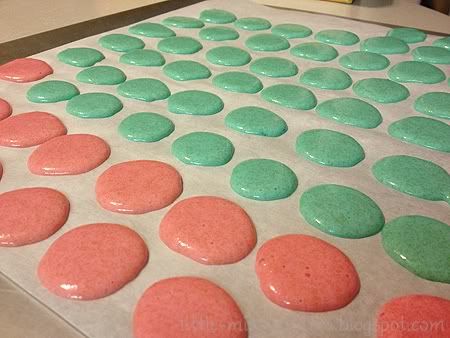
So much irregularity.. I'm embarassed! But hey, we can learn from my mistakes! :) When you're done piping, lift and drop the pans on a hard surface a couple times, to rid of any bubbles. Preheat the oven to 280F and allow the pans to sit out for 30 minutes. Bake for 15 - 20 minutes.
In the meantime, you can put together the vanilla buttercream. Beat the butter until soft, and gradually add 1 cup of the confectioner's sugar at low speed. When fully incorporated, choose a higher speed and add the vanilla extract, salt, and a tablespoon of milk. Beat for 2-3 minutes, or until smooth. If the frosting isn't holding shape, add more confectioner's sugar. If it needs to be thinned out, add a little milk.
Once the cookies are baked and cooled, group them into pairs of similar size and shape. Pipe or spoon the butter cream mixture onto a cookie, and squish it's partner right on top.
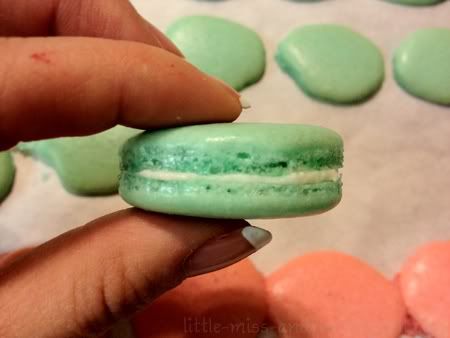
And this is how my first ever batch of macarons turned out. They look fine, but were not to my full expectations. I wanted a more prominent foot.. All the more reason to try again!
Let me know if you try the recipe out, and how things turn out for you!

15 comments
those look soooo yummy! love the colours you chose. I thought they were much more complicated.. I might give them a try! xx Alice Barton ♥ The Mow Way
ReplyDeleteI always thought the same! Let me know how they turn out if you give it a try :)
Deleteagain, huge respect for you!
ReplyDeletei'd believe it if you told me they are store-bought.
my big fear for baking is ingredients like 2 sticks of butter of one pound of sugar, etc. ignorance is bliss, sometimes.
but for sure, i am gonna buy some macarons today.
your friends and family are so lucky! ;)
Lena! They don't look THAT great. :P store bought is definitely way more convenient and less time consuming.. But factoring in the prices I like to make a ton for a fraction of the cost.. If you lived closer I would get you to help me test everything out!! :)
DeleteWow those look so good! I made some with my friends (twice actually) and none of them looked as good as yours! You had some great tips in this post that I haven't heard of actually, so I'll be trying them again :) Thanks for the awesome baking post!
ReplyDeleteAwe, thanks Annie! Let me know how they turn out when you do try again!
Deletehi sweetie,
ReplyDeleteoh dear you know that i really need this recipe. look so yummy. my boyfriend will have a birthday party next month and i decide to make something. i never bake anything before. so this is will be my first macaronnage for me. i will try my best. thank you for sharing the recipe dear.
sweetie, i have my first giveaway on my blog, you are invited to join it. if you dont mind, would you please to enter it? i will be so happy. kisses
less sugar sweet candy
Awe, I hope your boyfriend will love them! Let me know how they turn out :)
DeleteThey look good for a first try! i wanted to challenge myself just like you the first time i made these. to my surprise, i got feet on my first try! I was so excited haha. but mine fell apart with my filling, i tried making a vanilla ganache, it just didn't turn out well. I love the colours you chose for your macarons! i'm sure they tasted great!
ReplyDeleteLove macarons ! Yours look so good for a first attempt :) and I think we use the same mixer, is it a Kenwood ?? Mine is and it's so comfy using it !
ReplyDeleteYou're invited to enter my Valentine's giveaway to win 120 $ gift certificate and tights on Romwe.com !
Fashion and Cookies
Fashion and Cookies on Facebook
Follow me on Bloglovin
My Twitter
Thank you! My mixer is actually the Kitchen Aid Pro HD.. but I'm sure they work equally well! I use mine all the time :)
DeleteThese look so professionally done! Great job! I love them :)
ReplyDeleteThe Fashionable ESQ
http://www.thefashionableesq.blogspot.com/
omg you are seriously amazing.. i don't know what you are talking about because your macaroons are french boutique quality!! and i've had practically every kind of designer macaroon alive! i love the color choice you choice for these the pink and green are ADORABLE!!!
ReplyDeleteHMM i think i'd better refrain from the loubies hahahah.. i've heard that the new ones are actually made in plastic and spray painted to look like metal.. but i trip in flats HAHAH. haha so i'm thinking the plastic can still be hazardous to my health hahaha
That is awesome Andrea! Those are hard to make. I love the colors and they look delish. Good job!
ReplyDeletehttp://www.averysweetblog.com/
oh wow!Those macarons looks well yummy!!! I love macarons too!!! Thanks for sharing this with us:)I have yet to try making them too!
ReplyDeleteCinz
http://cinzee.wordpress.com
Thank you so much for stopping by! I would love to hear anything you have to say.